
Honeywell Wired Thermostat Guide: Expert Tips for 2026
Rising energy costs are driving UK homeowners to seek smarter, more efficient ways to heat their living spaces. The right honeywell wired thermostat can make all the difference in achieving both comfort and savings as we move into 2026.
Honeywell remains a trusted leader in home heating control, offering innovative solutions that fit modern demands. This comprehensive guide delivers expert advice on choosing, installing, and optimising your honeywell wired thermostat for today’s homes.
Explore the latest models, step-by-step installation, advanced features, troubleshooting tips, and upcoming trends. Ready to take control? Follow this guide for optimal results.
Understanding Honeywell Wired Thermostats in 2026
The honeywell wired thermostat has evolved into a staple of modern home heating, combining decades of innovation with the latest technology. As energy costs rise and households seek smarter solutions, Honeywell continues to lead with reliable, precise, and efficient thermostats. In this section, we explore how the honeywell wired thermostat has adapted to changing demands, and what makes it a standout choice for UK homes in 2026.

Evolution of Honeywell Wired Thermostats
Honeywell has built a reputation as a global leader in home heating control, with its first thermostats dating back over a century. Over time, Honeywell has consistently refined the honeywell wired thermostat, focusing on improved reliability and adaptability for different heating systems. By 2026, advancements include high-precision temperature sensors, expanded compatibility with boilers, underfloor heating, and heat pumps, and a focus on seamless integration with smart home infrastructure.
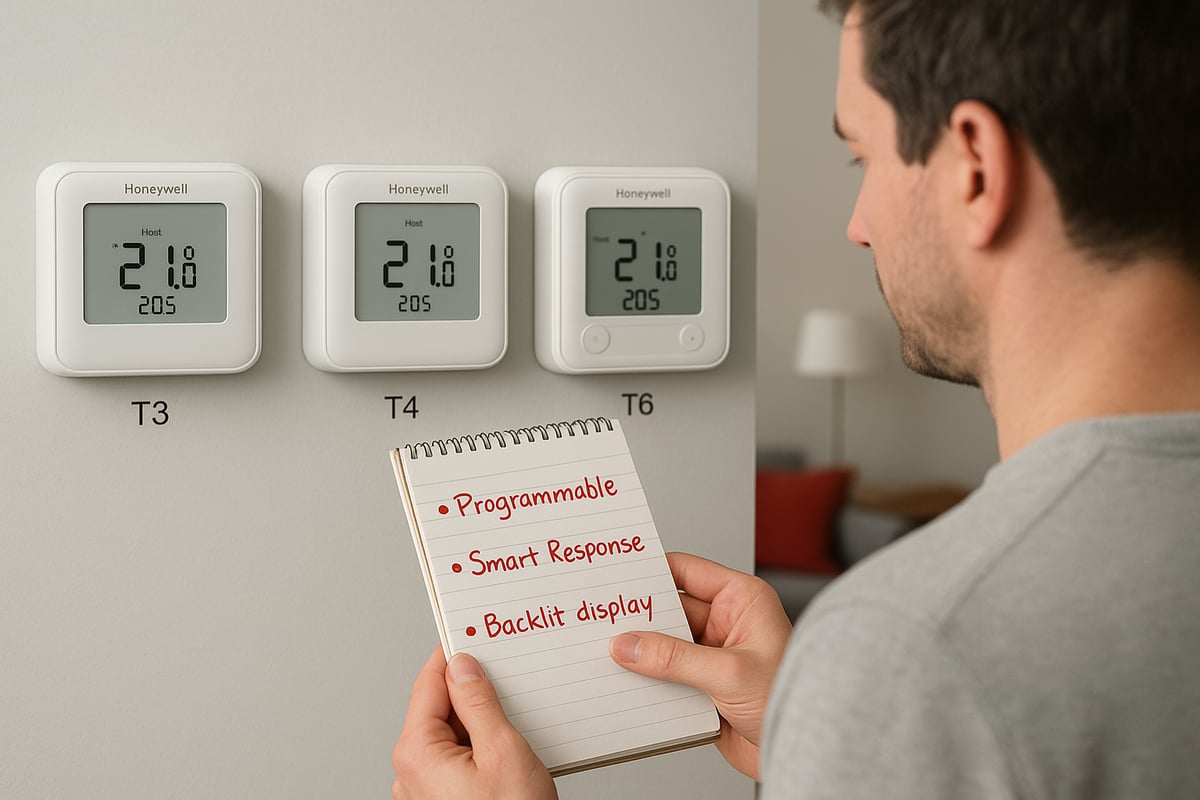
The honeywell wired thermostat stands apart from wireless and fully smart thermostats by offering a direct, stable connection to heating systems. This ensures consistent performance, especially in homes where wireless signals may be unreliable. Popular models in 2026, such as the T3, T4, and T6 series, cater to a range of needs, from basic programmable units to advanced devices with touchscreen controls and connectivity options.
Integration is a major strength. The honeywell wired thermostat now works with multi-zone setups, supporting both traditional and renewable energy heating sources. In the UK, wired thermostats remain highly valued for their reliability and security, with recent market data showing that wired models account for nearly 40% of thermostat sales between 2024 and 2026. User satisfaction rates for the honeywell wired thermostat consistently exceed 90%, particularly among homeowners seeking durable, maintenance-friendly controls.
Choosing between wired and wireless thermostats often depends on household needs. Wired models excel in permanent installations, offering fewer connectivity issues and robust performance. For example, a Victorian home with thick walls may experience wireless dropouts, making a honeywell wired thermostat the better solution. In contrast, wireless thermostats offer flexibility for renters or those wanting minimal installation.
Core Features and Capabilities
The honeywell wired thermostat in 2026 delivers significant improvements in temperature accuracy, often maintaining room temperature within 0.5°C of the set point. Energy efficiency is at the forefront, with programmable schedules allowing for custom heating cycles, reducing waste and lowering bills. Many models now support advanced customisation, including 7-day and holiday scheduling.
User interfaces have seen a transformation, with the T6 offering a full touchscreen, while the T3 and T4 feature backlit digital displays for easy operation. Connectivity is increasingly standard, enabling integration with smart home platforms where supported. Security and privacy features have also advanced, with encrypted data communication and robust user controls.
Durability is a hallmark of the honeywell wired thermostat, with most models rated for over 10 years of reliable service. Warranty periods typically range from 2 to 5 years, reflecting Honeywell’s confidence in their products. Independent testing shows that the latest models experience less than a 2% failure rate over five years.
For a clear view of the differences, consider the table below:
| Model | Display Type | Programmable | Smart Home Integration | Installation Complexity |
|---|---|---|---|---|
| T3 | Digital, backlit | Yes | No | Low |
| T4 | Digital, backlit | Yes | No | Low |
| T6 | Touchscreen | Yes | Yes | Medium |
For a deeper dive into specific features, see the Types of features on smart thermostats article, which outlines the options available across models.
In summary, the honeywell wired thermostat delivers a blend of time-tested reliability and modern features, making it a leading choice for homeowners aiming to balance comfort, efficiency, and future readiness.
Choosing the Right Honeywell Wired Thermostat
Selecting the ideal honeywell wired thermostat for your home in 2026 involves careful consideration of your property’s unique needs and the latest product innovations. With rising expectations for comfort and energy efficiency, understanding your options will help you make an informed investment.
Assessing Your Home’s Requirements
Before choosing a honeywell wired thermostat, start by reviewing your existing heating system. Is your home equipped with a combi boiler, system boiler, or conventional setup? Compatibility is crucial, as not every model supports all types. For example, the T3 series is often ideal for standard boilers, while the T6 offers advanced options for heat pumps and underfloor heating.
Consider your need for single or multi-zone control. If you want to manage different temperatures in various rooms, opt for a model that supports multi-zoning. This flexibility is especially valuable for larger homes or properties with complex layouts.
Future-proofing matters too. Look for a honeywell wired thermostat that receives regular software updates and can expand with your heating system upgrades. Choosing a model with app support or integration with smart home platforms ensures your investment remains relevant.
Budget is another key factor. While entry-level thermostats provide essential features, mid-range and premium models deliver greater customisation and efficiency gains. Weigh the upfront cost against potential energy savings.
For more context on integrating your thermostat with modern heating systems, see this Guide to smart heating controls.
Consider a typical UK home upgrading from a manual thermostat. By selecting a compatible honeywell wired thermostat, the homeowner benefits from improved scheduling, better temperature control, and tangible savings over time.
Comparing Honeywell Models
Honeywell’s 2026 wired range includes the T3, T4, and T6 series, each with distinct advantages. The T3 stands out for its simplicity and straightforward installation, making it a popular choice for basic heating setups. The T4 adds enhanced programmability and a clearer digital display, while the T6 introduces touchscreen controls and advanced connectivity options.
Here’s a comparison table to illustrate the key differences:
| Model | Programmability | Display Type | Smart Integration | Installation Complexity |
|---|---|---|---|---|
| T3 | 7-day basic | Digital LCD | No | Low |
| T4 | 7-day flexible | Backlit LCD | Limited | Moderate |
| T6 | Custom/Smart | Touchscreen | Yes | Moderate-High |
When selecting a honeywell wired thermostat, read user reviews and consider ratings compared to competitor brands. UK homeowners have rated the T6 highly for its intuitive interface and robust support, while the T4 remains a favourite for value and reliability.
Warranty terms and customer service are also important. Most Honeywell models include at least a two-year warranty, with extended support available for premium models.
Between 2024 and 2026, the T4 and T6 have become the most popular honeywell wired thermostat options in the UK, reflecting a shift towards greater customisation and integration with smart home systems.
Step-by-Step Installation Guide for Honeywell Wired Thermostats
Installing a honeywell wired thermostat in 2026 is a rewarding project for homeowners seeking better energy control and comfort. Following a clear, structured approach ensures a safe, effective installation and optimal performance.
Pre-Installation Preparation
Before starting your honeywell wired thermostat installation, prioritise safety. Always switch off the power at the circuit breaker to protect yourself and your heating system. If your home uses gas, adhere to Gas Safe regulations and consult a certified engineer if needed.
Gather the following tools and materials:
- Screwdrivers (flathead and Phillips)
- Drill and appropriate bits
- Spirit level
- Wire strippers and electrical tape
- The new honeywell wired thermostat and its backplate
- Manufacturer’s manual
Read the full manual for your chosen model before proceeding. This ensures you understand both the product features and the installation sequence. Next, inspect the existing wiring and backplate. Compare them with the new thermostat’s requirements. If you need guidance, review a Thermostat Wiring Diagram to visualise typical honeywell wired thermostat connections.
Check that your wiring is compatible, especially if upgrading from an older system. For example, some homes may require a Honeywell Wire Saver for optimal operation. Document the wiring layout and be cautious of any worn or corroded wires.
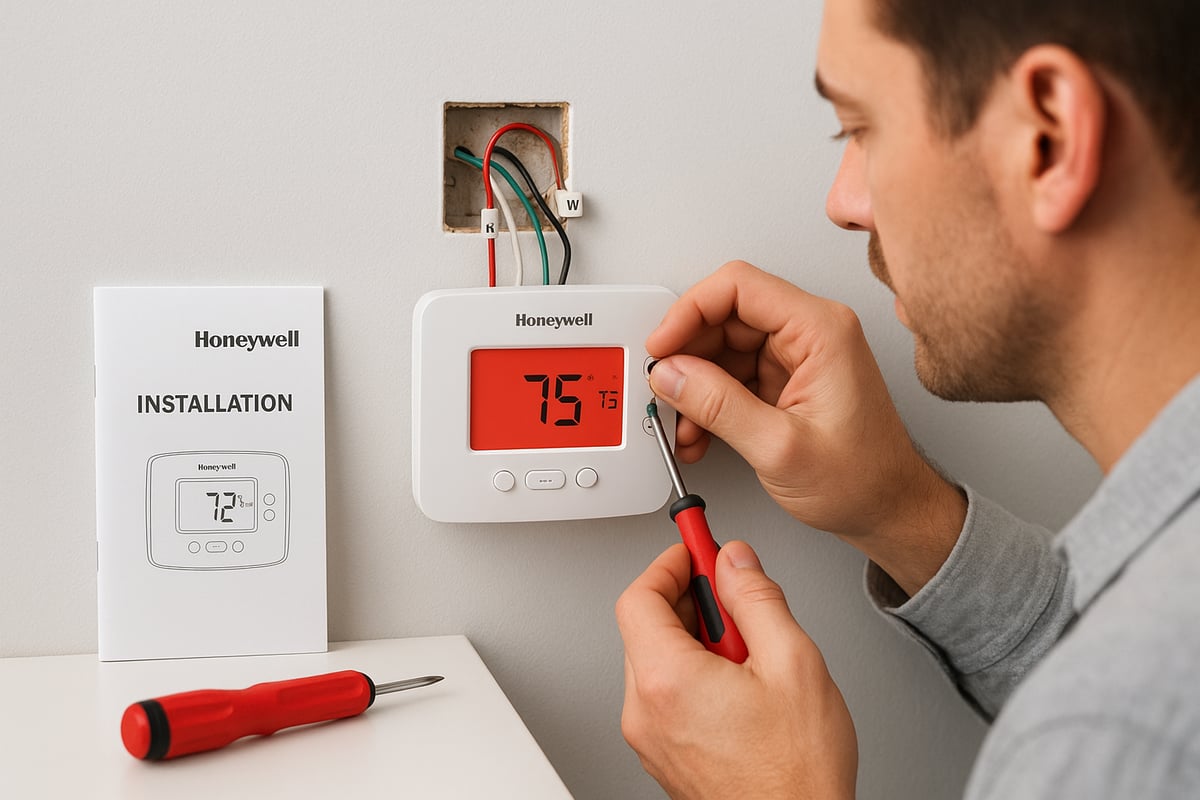
Removing the Old Thermostat
Start by carefully removing the cover of the existing thermostat. Use a screwdriver to loosen mounting screws, then gently pull the device from the wall. As you expose the wiring, label each wire according to its terminal using masking tape or pre-printed labels. This makes connecting your new honeywell wired thermostat much simpler.
Common wire labels include:
- L (Live)
- N (Neutral)
- 1, 2, 3 (switching wires for heating, hot water, etc.)
- Earth (if present)
If you encounter loose or corroded wires, trim and re-strip them for a clean connection. Take a photo of the wiring before fully disconnecting the old unit. This serves as a valuable reference.
Handle the wires gently to avoid damage. Remove the old backplate, ensuring no debris or insulation falls into the wiring cavity. If you find unfamiliar wiring or non-standard colours, consult a professional before proceeding with your honeywell wired thermostat installation.
Installing the New Honeywell Wired Thermostat
Begin by mounting the new backplate in the same position as the previous one. Use a spirit level to ensure it sits straight, then secure it with the provided screws. Feed the labelled wires through the backplate’s opening.
Connect each wire to the correct terminal as indicated in the honeywell wired thermostat manual. Double-check all connections for firmness and accuracy. If you are unsure about a wire’s function, refer to your earlier photo or a wiring diagram.
Once all wires are connected, attach the thermostat unit to the backplate. Tighten any retaining screws and ensure the device sits flush against the wall. Restore power at the circuit breaker and observe the display.
If the honeywell wired thermostat does not power up, recheck the wiring and fuse. Common installation errors include:
- Incorrect terminal placement
- Loose connections
- Tripped circuit breaker
Troubleshoot as needed, and never force wires into terminals. If you encounter persistent issues, consult a qualified engineer.
Initial Configuration and Testing
With your honeywell wired thermostat powered on, begin by setting the correct time and date. Many models prompt you through initial setup on a touchscreen or digital display. Follow on-screen instructions to select your heating system type and basic schedule.
Test the heating response by adjusting the temperature up and down. Listen for the boiler or heating system to activate and ensure the display reflects changes promptly. If the system does not respond, revisit the wiring or consult the troubleshooting section of the manual.
Adjust default settings to match your local climate and household routines. For example, set lower temperatures during the night and higher settings before morning routines. Common setup mistakes include skipping the schedule setup, entering incorrect time zones, or failing to save custom settings.
To avoid these pitfalls:
- Double-check each setup step
- Save schedules before exiting the menu
- Test heating in all programmed periods
A successful honeywell wired thermostat installation delivers precise control, energy savings, and peace of mind for years to come.
Advanced Settings and Optimisation Tips
Unlocking the full potential of your honeywell wired thermostat involves more than basic setup. Advanced settings and optimisation can drive efficiency, enhance comfort, and reduce your energy bills. Let us explore how to fine-tune your thermostat for peak performance in a modern UK home.

Customising Schedules for Maximum Efficiency
Begin by tailoring your honeywell wired thermostat to fit your household routine. Most models let you create weekday, weekend, and holiday schedules, ensuring the heating only runs when needed.
- Set different temperatures for mornings, evenings, and overnight.
- Use the holiday mode to reduce heating while away.
- Adjust for seasonal changes to avoid unnecessary energy use.
Advanced models, like the Honeywell T6, offer adaptive learning, automatically adjusting heating times based on your preferences and habits. This not only ensures comfort but also maximises the efficiency of your honeywell wired thermostat. A sample schedule might look like this:
| Time | Temperature | Setting |
|---|---|---|
| 06:30–08:30 | 21°C | Morning Boost |
| 08:30–16:00 | 17°C | Daytime Setback |
| 16:00–22:30 | 20°C | Evening Comfort |
| 22:30–06:30 | 16°C | Night Economy |
Review your programmed schedule every few months to ensure it still matches your daily routine. This approach keeps your honeywell wired thermostat working efficiently all year.
Integrating with Smart Home Systems
Many homeowners want their honeywell wired thermostat to connect with wider smart home platforms. While some wired models are standalone, others, like the T6, offer integration with systems such as Apple HomeKit, Google Assistant, or Amazon Alexa. This means you can adjust your heating remotely or with voice commands.
- Check your thermostat’s compatibility with smart assistants.
- Download the Honeywell app or use third-party platforms for remote access.
- Set up routines, such as lowering the temperature when you leave home.
Integration boosts convenience and allows real-time monitoring of your honeywell wired thermostat from your smartphone or tablet. Imagine adjusting your heating before arriving home on a cold day, or linking your thermostat to other devices for a seamless smart home experience.
If your model supports it, take advantage of voice control for hands-free management. This not only adds convenience but also encourages proactive energy management.
Energy-Saving Techniques
Optimising your honeywell wired thermostat is key to lowering your heating bills. Make use of features such as eco modes and setback temperatures, which reduce energy use when rooms are unoccupied.
- Enable eco mode to maintain comfort while using less energy.
- Set lower temperatures during the night or when away from home.
- Monitor your usage statistics if your model supports it.
According to industry data, upgrading to a programmable honeywell wired thermostat and using advanced settings can cut heating bills by up to 15 percent. For more on the advantages of smart thermostats, see the Benefits of installing a smart thermostat.
Consider a case study: a family in Kent upgraded to a Honeywell T6 and programmed custom schedules. Within three months, their energy consumption dropped noticeably, with no loss in comfort. This demonstrates the real-world impact of an optimised honeywell wired thermostat.
Regular Maintenance and Updates
Keeping your honeywell wired thermostat in top condition is straightforward but essential for longevity and efficiency. Begin with regular cleaning to remove dust from the display and vents.
- Check wire connections annually to ensure safety.
- Review and install software or firmware updates if available.
- Run a system test at the start and end of each heating season.
A simple maintenance checklist can help:
- Wipe the thermostat surface gently each month.
- Inspect wiring and backplate for secure connections.
- Update software via the app or manufacturer’s website.
- Contact a professional if you notice inconsistent readings.
Staying proactive with maintenance ensures your honeywell wired thermostat operates reliably and is ready for any future upgrades. If you encounter persistent issues, consider professional servicing to preserve your investment.
Troubleshooting and Common Issues
Tackling issues with your honeywell wired thermostat can restore comfort and efficiency quickly. Even with modern designs, common problems may arise during installation or daily use. This section provides clear troubleshooting steps, empowering you to resolve most faults before seeking professional assistance.
Diagnosing Installation Problems
When your honeywell wired thermostat displays no power or a blank screen after installation, start by checking the circuit breaker and ensuring the power supply is switched on. Faulty or loose wiring is a common culprit. Always compare your wiring to the manufacturer’s diagram, and label wires during removal to prevent confusion.
If your heating fails to respond, inspect both the relay and the wiring at the backplate. Corroded or poorly connected wires can disrupt the signal. For incorrect temperature readings, the sensor may need calibration or could be affected by external heat sources, such as direct sunlight or appliances.
Here’s a quick checklist to guide your diagnosis:
- Power off the heating system before touching any wires.
- Use a voltage tester to confirm live connections.
- Verify all wires are correctly and securely attached.
- Refer to the official Honeywell T6 Pro Installation Guide for detailed instructions.
Following these steps helps ensure your honeywell wired thermostat operates safely and reliably.
Operational Issues and Solutions
If your honeywell wired thermostat does not follow scheduled settings, a software reset often resolves the issue. Unresponsive controls or frequent error codes may indicate a need for a firmware update or a factory reset. Consult the user manual for the meaning of specific error codes, as these can point directly to faulty sensors or power disruptions.
Common operational issues include:
- Thermostat not switching on at scheduled times.
- Display showing error codes or flashing lights.
- Heating or cooling activating at the wrong times.
To address these, try resetting the thermostat, checking for software updates, and reviewing your programmed schedules. Avoiding common setup mistakes is key, so review common mistakes with smart thermostats to prevent recurring problems.
Remember, keeping your honeywell wired thermostat’s settings up to date can improve comfort and reduce future errors.
When to Seek Professional Help
There are situations where professional intervention becomes necessary. If you encounter complex wiring, repeated power failures, or persistent error codes that do not resolve with resets, it’s best to contact a qualified engineer. Attempting advanced repairs yourself may risk damaging the honeywell wired thermostat or your heating system.
Safety is paramount. Only Gas Safe registered engineers should handle wiring connected to boilers or mains power. If you notice burnt wires, a persistent burning smell, or continuous system faults after troubleshooting, stop immediately and seek expert assistance.
For example, a homeowner recently attempted to install a honeywell wired thermostat in a Victorian-era property. Unexpected wiring configurations led to repeated system failures. A professional engineer quickly identified and resolved the issue, ensuring safe and effective operation.
Always prioritise safety and seek help when in doubt to protect both your home and your honeywell wired thermostat.
Future Trends in Wired Thermostats and Home Heating
Staying ahead of the curve is essential when considering a honeywell wired thermostat for your home in 2026. The future brings exciting advancements, integrating smart technology, sustainability, and enhanced user satisfaction. Let us explore what lies ahead for the honeywell wired thermostat and how these trends will shape modern home heating.
Innovations in Thermostat Technology
The next generation of the honeywell wired thermostat is set to embrace artificial intelligence, learning user routines and adjusting temperatures automatically. Improved sensors will deliver even more precise climate control, ensuring comfort and efficiency. Seamless integration with renewable energy sources, such as solar panels and heat pumps, will help households reduce their carbon footprint.
User interfaces are evolving as well. Expect touchscreens with enhanced accessibility features, making it easier for everyone in the home to interact with the honeywell wired thermostat. Developments in wiring solutions, like the Honeywell Wire Saver Installation Guide, promise to simplify installation and future upgrades.
Manufacturers are also focusing on security and privacy, with encrypted communication and regular firmware updates. These innovations are designed to keep your home both comfortable and safe.
The Role of Wired Thermostats in Smart Homes
The honeywell wired thermostat is increasingly becoming a core component of hybrid control systems, working alongside wireless and app-based solutions. This approach offers the reliability of a wired connection with the flexibility of remote adjustments, giving homeowners the best of both worlds.
Security remains a top concern. Wired thermostats are less prone to wireless interference, and their robust design appeals to those seeking dependable performance. As smart homes become more common, the honeywell wired thermostat will continue to offer strong data privacy, reducing the risks associated with fully wireless devices.
Sustainability is also a key trend. Many homeowners are choosing wired models for their long lifespan and lower environmental impact. The integration with eco-friendly heating systems supports the shift towards greener living.
Market Outlook and Consumer Preferences
Market data shows a steady rise in honeywell wired thermostat adoption from 2024 to 2026, driven by demand for reliability and efficiency. Surveys reveal that users value easy programmability, responsive support, and compatibility with modern heating systems.
| Feature | User Satisfaction (%) | Demand Growth (2024-2026) |
|---|---|---|
| Reliability | 92 | +8% |
| Energy Efficiency | 89 | +10% |
| Smart Integration | 85 | +12% |
| Security/Privacy | 90 | +9% |
Preferences are shifting, with many homeowners opting for hybrid systems that combine the strengths of a honeywell wired thermostat with wireless controls. As technology advances, expect continued growth in user satisfaction and a greater focus on intelligent features and sustainability.
After exploring the latest advancements and expert tips for Honeywell wired thermostats, you’re now equipped to make smart choices for a warmer, more efficient home. If you’re considering a new installation or need tailored advice for your property in Kent, why not trust the professionals with over 20 years of experience? We understand the unique requirements of local homes and can help you optimise your heating system for comfort and savings. Ready to take the next step towards reliable, energy efficient heating?
Keeping Homes in and around kent Warm, Dry & Flowing Book with castle heating kent
